
Blockheads 5 - Block 5
- Jenelle Kent
- Oct 11, 2023
- 3 min read

Hi everyone,
Well it's another exciting Blockheads Day today, but extra special for me because todays block is the one I designed. I have called it Southern Star because I live in Australia and we have a stellar constellation here called the Southern Cross. The Southern Cross is made up of 4 stars, each at the point of the cross and it also features on our National Flag.

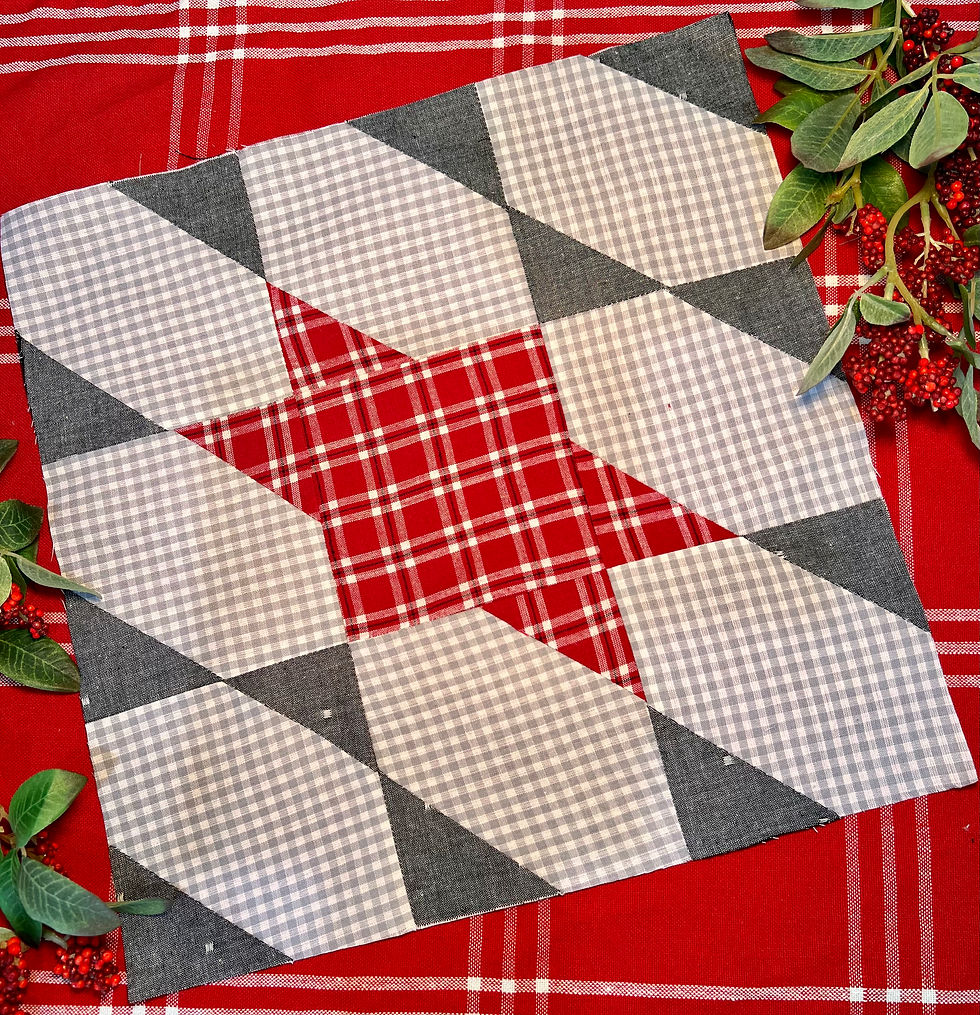
Here are 2 different versions of a 6 ½" block of Southern Star. You can see the centre A block in the right block is different to the grey, red and white one, on the left. Instead of having a background fabric used for the centre Block A, I chose to use a block of C fabric. This creates a solid star in the centre of the block.

Here is the block with the solid star again.
I have had a few people as me about the Christmas Decorations I am using in my Blockheads photography.
They are from my new Christmas booklet titled 'Christmas with Panache'. You can order the pattern book here.
It features 7 different Christmas projects with my new fabric line, Panache, which you can read more about here. It will arrive in stores April 2024.
Of course you can use any fabric you like, to make the projects, you don't have to repeat what I have used.
So let's press on with Southern star.
I recommend starching your fabrics prior to cutting, particularly when you are working with small pieces. I use woven checks and stripes a lot and they can curl up a little when you press them. The spray starch seems to help prevent this. I am using Best Press for these blocks and it is working well... it also smells great!
Once all your pieces are cut out, it is time to sew the stitch-and-flip B and C squares to the larger A squares. To avoid making mistakes, I like to lay out my block on the table beside my sewing machine.
On the four corner A blocks you will sew a B square on opposite corners of each. I like to chain piece these through, it saves lots of time and thread.
On the centre A block you need to sew a C square on opposite corners, for the block with a hollow centre star. Or, for the version with the solid red star, do nothing to the centre block; it is just cut from C fabric.
For the remaining 4-A blocks you will sew a B fabric on one corner and C fabric on the opposite corner. Once again, chain piecing is recommended.
I also use diagonal seam tape on my sewing machine, it saves me drawing a diagonal line on all the B and C squares.

Once all the corners are trimmed and pressed I lay the block on the table and I am ready to sew it together.
I sew 3 rows first and then I sew the rows together.
You can see I have fussy cut the centre block from the checked fabric. I have centred the checks and cut the square so the edges are parallel to the weave.

Here are the squares sewn together into 3 rows.
For the top and bottom rows I have pushed the seams towards each ends of the row. The centre row I have pushed the seams towards the centre square. The seams will nest together nicely if you do this.
I didn't press the rows, I like a little flexibility when I sew the rows together, so I just finger press those seams.
Here is my 12" version of Southern Star. I have used C fabric to cut the centre square to create that solid star. Once again the centre square check has been carefully cut to centre the checks successfully.
After the first 9 Blockheads Blocks are released I will have a Christmas Finishing option for you.
It is designed for nine 6 ½" blocks and will be available on my website to download for free.
I hope you enjoyed sewing my Southern Star block, I am looking forward to seeing all your versions of it, sewn up.
Happy sewing
Jenelle


Comments