
Machine Quilt Binding
- Jenelle Kent
- Apr 28, 2020
- 4 min read

Binding a quilt is the final step to finishing your quilt. This tutorial will outline how to make your binding, sew it onto your quilt and then finish it all by sewing machine. Now, don't get me wrong, I do love hand finishing a quilt binding. There is something very relaxing and therapeutic about sitting with your new quilt, on your lap, and sewing around the binding by hand. But, sometimes, you just don't have time! Or the quilt needs a very hardwearing finish because you know it will be getting some rough treatment - and that's OK, because I like my quilts to be used and washed and used again.
Step 1 - How Many Strips?
Work out how many strips of binding you require. Measure the total perimeter of your quilt (in inches) and divide that number by 40. That's the width of your fabric, or the length of your strips. Round up the answer to the nearest whole number - this is how many strips you need. Eg: My quilt measures 300" around the outside edges. 300 divided by 40 = 7.5. So I need 8 strips of binding.

Step 2 - Joining the Strips
Cut your binding strips 2 ½" wide. They should be the full width of the fabric. Place your binding strips, right sides together at right angles. Have the selvedges sticking out. Sew diagonally across, to and from where the fabric crosses over. See the pin in the photo.
Chain piece all the binding strips one after the other.

Step 3 - Making the Binding

Trim off the excess seam allowance, ¼" past the seam.
Press the seams open.

Press the whole binding in half, lengthways, right sides together, so the long edges match. Sew the photo below.

Step 4 - Sew the Binding on the Back
Place your binding on the BACK side of the quilt, so the raw edges of the binding match the raw edges of the quilt. Start in the middle of a side and leave a 12" (approx) long tail of binding at the start. Use your walking foot and a ¼" seam. Start at the pin, in the photo.

Stitch to the corner of the quilt, but stop ¼" from the corner (see pin in photo) and sew a back stitch. Remove the quilt from your machine.

Step 5 - Mitre the corner.
Fold the binding, up away from the quilt, so the raw edge of the binding makes a straight line continuing from the raw edge of the quilt. The fold of the binding is 45 degrees.

Fold the binding back down so the raw edges of the binding matches the raw edge of the quilt.The fold will be level with the edge of the quilt. Sew onto the quilt and do a backstitch, still using a ¼" seam.
Sew to the next corner and stop ¼" short with a backstitch.
Repeat the mitred corner process at each corner.

Step 6 - Where to Cut the Binding Ends

Stop sewing about 16" before the starting point. You will have two long ends of binding. Check you have enough binding so the ends will overlap, at least 3".
Place a pin in the centre of the gap between where you started the binding and where you finished. Lay down one end of the binding, flat along the edge of the quilt and trim off the end level with the pin.
Place a small ruler on the binding so the edge of the ruler lines up with the trimmed end of the binding.

Lay the rest of the binding flat, along the edge of the quilt so it overlaps the trimmed end and the ruler. Trim off the excess binding at the 2 ½" mark on the ruler - you want the ends of the binding to overlap each other 2 ½".

See how the end of the binding now overlaps the other end by 2 ½".

Step 7 - Joining the Ends
Open up the two ends of the binding and lay them right sides together.

Keeping the binding right sides together, turn one end at 90 degrees to the the other.

Pin the diagonal. Check to see that you have pinned the correct diagonal, by laying the binding along the edge of the quilt. It should fit perfectly.

If you need to, draw the diagonal seam line on the binding. I sew it by eye, but I have had a lot of practice!
Sew the diagonal seam and trim off the excess fabric ¼" past the seam allowance.

Step 8
Pull the binding so it lays straight along the edge of the quilt and sew up the gap between where you started the binding and where you finished. The binding is now completely sewn onto the back side of the quilt.
Step 9 - Finishing the Binding by Machine.
Fold the binding over to the front side of the quilt. Hold it in place with a few Wonder clips.
Using your walking foot sew the folded edge of the binding to the top edge of the quilt, very close to the fold. Use a thread in your bobbin that matches the backing fabric and a thread on the top that matches your binding fabric.


At a corner, fold in one edge and then the other so it creates a nice mitre. Pivot the machine at the corner by leaving the needle down and lifting the foot and turning the quilt.


Continue stitching until all the binding is sewn down.
The stitching line, on the back, will be visible just outside the binding.
See the examples below.


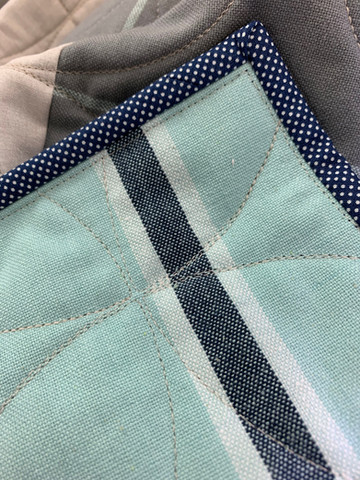
The navy blue binding has a peeper on the front. I will save that for another tutorial in the future.
Happy binding
Jenelle
I just watched the tutorial on machine quilt binding, and the final step of finishing the edges neatly is so satisfying. It actually reminds me of the clean, professional look you get with Thesis Binding in UAE for important academic work. This video was a huge help for getting that perfect polished result on my project.